
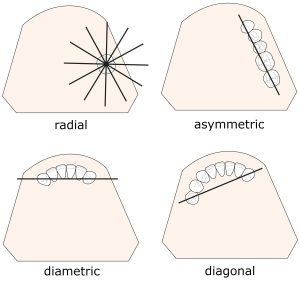
Fulcrum lines according to the position and number of abutment teeth on the dental arch
When only a single abutment tooth is present, numerous radial or rotational fulcrum lines may develop. This results in excessive mobility of the prosthesis, making single-tooth-supported removable partial dentures an unfavorable option.
When the remaining teeth are located on one side of the arch, a unilateral asymmetric fulcrum line is established. Due to the unequal abutment teeth location on both sides of the arch, this results in increased mobility of the prosthesis.
A bilateral diametric fulcrum line is established between two terminal abutment teeth positioned symmetrically on both sides of the arch. This configuration is more advantageous compared to the previous two scenarios.
Between two primary abutment teeth positioned asymmetrically on either side of the arch, a bilateral diagonal fulcrum line develops, and this configuration is once again better than the first two in terms of prosthesis movement (Figure 1-12).
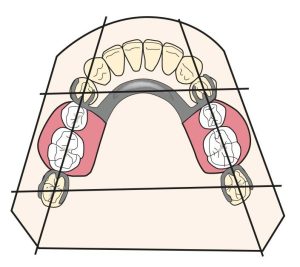
When the number of primary abutment teeth exceeds two, a sustentation plane, rather than a fulcrum line, is generated, and this configuration improves the retention and stability of the prosthesis (Figure 1-13).
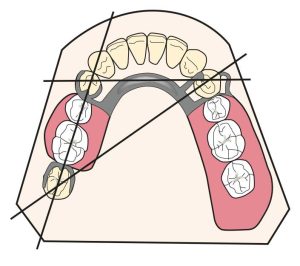
A triangular sustentation plane is developed between three abutment teeth positioned on both sides of the arch. However, in the presence of distal extension denture base, there is always the possibility of rotation around the fulcrum line formed between the primary abutments—one adjacent to the distal extension denture base and the other located most posteriorly on the opposite arch.
When four symmetrically positioned abutment teeth are present on both sides of the dental arch, a quadrangular sustentation plane is developed, and this typically applies to Kennedy Class III cases with a posterior modification.